
Exporting videos is an important step in professional video editing. If you’re new to editing or using a new software, exporting can be confusing. In this article, we’ll break down the basics of exporting a video in DaVinci Resolve, a popular editing software.
Why DaVinci Resolve? This video editing software is available to both beginner and pro video editors. It is free to download and use. The free version of the software give you a ton of features to edit your videos. Here is how you export your final videos in DaVinci Resolve.
How To Export Video in DaVinci Resolve
Exporting your videos in DaVinci Resolve can be a challenging task, especially if you’re new to video editing. But don’t let that stop you from delivering your work professionally. Follow these easy steps and export your videos like a pro.

Total Time Needed :
10
Minutes
Required Tools:
Things Needed?
Steps to export videos in Davinci Resolve

Once you’ve finished your video, added sound effects, and applied color grading, head to the Delivery page. In DaVinci Resolve, the Delivery page is where you render your content. Here, you’ll see the render settings on the left, a preview monitor in the center, and a render queue on the right.

In the render panel, you’ll name your file and choose where you want it to be saved. If you want to export low-resolution files, you can choose to export individual clips instead of one large video file. This option is handy if you need to deliver footage of individual clips that have been graded.

The format and codec are important parameters for exporting a video. The preferred format for online encoding is Quicktime with an H.264 codec, but you can also use H.265. The quality will depend on the requirements of the platform you’re rendering for.

The resolution and frame rate should match your project settings. If you need to revert the timeline settings, go back to the Edit tab and change the timeline to 4K under Project Settings.
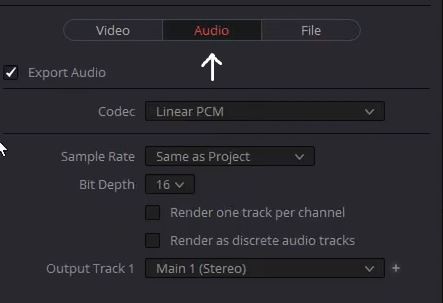
If you need to change the audio or file settings, you can do that by hitting the audio or file button. You can also choose to export your video without audio.

If you don’t want to export the entire timeline, you can select Render In and Out Range. This feature allows you to create a shortened area to export, which is useful if you need to send one scene to an actor for their showreel. You can also add many in and out points to the render queue.

Once you’ve adjusted all the settings, you can add your video to the render queue and start the render. DaVinci Resolve will display the percentage and time estimate until the export is finished. You can choose where you want to export the video to. DaVinci Resolve offers several options that will export and upload the final video to whichever platform you’d like.
Want to visualize the exporting process? Follow this video tutorial where the author walks you through the above stages.
In conclusion, exporting videos in DaVinci Resolve is a straightforward process that requires you to adjust a few settings. By following this step-by-step guide, you’ll be able to export your videos like a pro. Remember to review your footage one last time, adjust your settings, and hit Start Render to begin exporting your video.